
Vinyl Wall Decal Application Tips And Tricks
Vinyl wall decals are an easy way to decorate your home, office, or classroom without paint or heavy tools. They come in endless shapes, sizes, and colors. You can find quotes, animals, geometric patterns, and even custom designs. When applied correctly, vinyl decals look professional and can last for years. But if you rush or skip steps, bubbles, wrinkles, or peeling can happen. Many beginners think decals are as simple as stickers, but there’s a bit more to a smooth, lasting result.
If you want your wall decals to look great and stay put, a few pro tips make all the difference. This guide will show you not just the basic steps, but also the tricks experts use for a flawless finish.
You’ll learn how to pick the right surface, avoid common mistakes, and handle tricky spots like textured walls or large designs. Let’s get started on making your space stand out with confidence.
Understanding Vinyl Wall Decals
Vinyl wall decals are thin, flexible designs made from adhesive vinyl. They stick to walls and many smooth surfaces. There are two main types: removable and permanent. Removable decals are best for renters or people who change their décor often. Permanent decals work well for long-term installations.
A typical decal has three layers:
- The backing paper (protects the adhesive)
- The vinyl design (the part that stays on your wall)
- The transfer tape (helps move the design to your wall)
The quality of each layer can affect application. Cheaper decals may have weaker adhesive or flimsy transfer tape, making the process harder.
Choosing The Right Surface
Not every wall is good for decals. The surface you pick will decide how well the decal sticks and how long it lasts. Here’s what you need to know:
Best Surfaces For Decals
- Smooth painted walls (latex or acrylic paints, fully cured)
- Glass (windows, mirrors)
- Metal (refrigerators, doors)
- Tile (bathroom or kitchen backsplashes)
- Smooth wood
Surfaces To Avoid
- Textured walls (popcorn, orange peel, stucco)
- Brick or unfinished concrete
- Dirty, greasy, or damp areas
- Freshly painted walls (wait at least 2 weeks after painting)
A simple test: rub your hand over the wall. If it feels bumpy, rough, or chalky, decals may not adhere well.
Prepping Your Wall: The Hidden Key To Success
Preparation is the most skipped step, but it’s crucial. Dust, oil, or moisture can ruin adhesion. Here’s a quick checklist:
- Clean the wall: Wipe with a damp cloth and mild soap. Avoid harsh chemicals. For glass or tiles, use rubbing alcohol.
- Dry completely: Moisture under the decal can cause bubbles or peeling.
- Check temperature: Ideal room temperature is 60–80°F (15–27°C). Too cold or hot can affect the adhesive.
If your wall is newly painted, be patient. Paint needs time to cure. Applying a decal too soon can cause bubbling or damage the paint.
Essential Tools For Application
You don’t need fancy equipment, but having the right tools makes the process smoother:
- Squeegee or credit card (to press decal evenly)
- Measuring tape or ruler
- Level (to keep words or shapes straight)
- Pencil (for light marks)
- Masking tape (to hold the decal in place)
- Tweezers (for small pieces)
Some decal kits include a small squeegee, but a regular credit card works fine for most jobs.

Credit: www.amazon.com
Step-by-step Application Guide
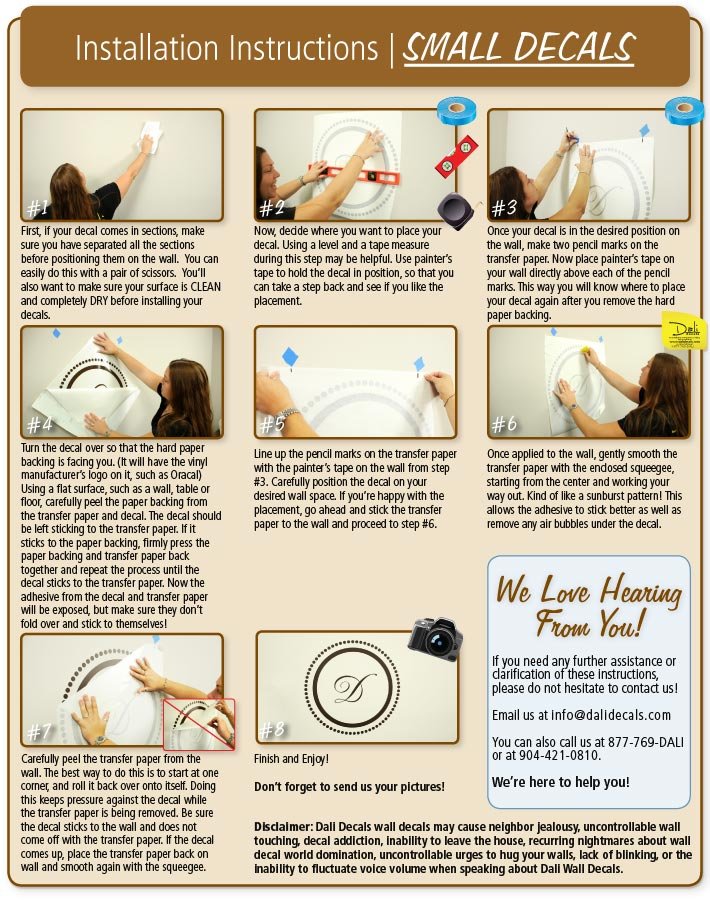
Here’s a detailed process to apply vinyl wall decals without stress:
- Plan the placement: Hold the decal up to the wall. Use masking tape to mark the corners or edges. For words or quotes, use a level to avoid crooked lines.
- Peel the backing: Lay the decal face down. Slowly peel away the backing paper, leaving the decal stuck to the transfer tape. Go slow, especially with thin or detailed designs.
- Position the decal: Place the sticky side onto your wall, using your tape marks as a guide. Use masking tape as a “hinge” at the top edge for large decals, so you can flip it up and down.
- Press and smooth: Start from the center and move outward. Use your squeegee or credit card to press the decal onto the wall. Smooth out bubbles as you go.
- Remove the transfer tape: Peel the transfer tape off slowly at a sharp angle. Watch for any vinyl that tries to lift—press it back down with the squeegee.
- Final touch: Smooth over the decal with your hand or squeegee. Check for edges that need extra pressure.
For extra-large decals, consider cutting the design into smaller sections and applying one at a time.
Tips And Tricks For A Flawless Finish
Even if you follow basic steps, some extra strategies help avoid problems and make your decal look amazing.
1. Work Slowly And Carefully
Rushing is the top cause of mistakes. Patience gives you time to fix bubbles, align edges, and avoid wrinkles.
2. Use The Hinge Method For Large Decals
For big designs, use masking tape as a “hinge” along the top edge. This lets you flip the decal up, remove the backing, then smooth it down in perfect position.
3. Cut Apart Complex Designs
If your decal has many separate pieces, cut them apart before applying. This gives you more control and easier placement, especially around outlets or corners.
4. Warm The Wall For Better Adhesion
If your room is cold, briefly warm the wall with a hair dryer (not too hot). This softens the adhesive and helps the vinyl stick better.
5. Pop Bubbles With A Pin
Small air bubbles can appear even with careful pressing. Use a pin or needle to pop them, then smooth the area gently.
6. Avoid Stretching The Decal
Pulling or stretching vinyl can cause it to shrink or warp later. Always handle with gentle, even pressure.
7. Handle Textured Walls With Care
Textured walls are tricky. Press the decal with extra force using a squeegee. For stubborn spots, warm with a hair dryer and press again. Still, expect some areas may not stick perfectly.
8. Layering Decals
If your design has multiple colors or shapes, apply the bottom layer first. Let it set for a few hours before adding the next layer. This prevents shifting and improves alignment.
9. Cleaning Around Decals
Once installed, clean around the decal with a damp cloth. Avoid scrubbing directly over detailed edges.
10. Removing And Reapplying
Removable vinyl can sometimes be repositioned. Gently peel and move as needed, but too much handling can weaken the adhesive.
11. Dealing With Small Or Delicate Details
Tiny letters or thin lines are fragile. Use tweezers for placement and peel the transfer tape back slowly at a sharp angle.
12. Protecting The Decal
For high-traffic areas or bathrooms, consider a thin layer of clear, matte spray sealant (test on a small area first). This adds durability.
13. Know When To Call For Help
Large wall murals or custom shapes can be challenging. Don’t hesitate to ask a friend for help or consult a professional installer for big projects.
Common Problems And Solutions
Even experienced users face issues. Here’s a quick reference for fixing them:
| Problem | Possible Cause | How to Fix |
|---|---|---|
| Bubbles after application | Trapped air or dust | Pop with a pin and smooth gently |
| Peeling edges | Dirty surface or too much texture | Press edges firmly, warm with hair dryer |
| Decal won’t stick | Wall is too cold, dirty, or freshly painted | Clean again, let paint cure, warm wall |
| Wrinkles or creases | Decal stretched or applied too fast | Lift gently and reapply, use less tension |
Comparing Removable Vs. Permanent Vinyl
Choosing the right type of vinyl matters for your project. Here’s how they compare:
| Feature | Removable Vinyl | Permanent Vinyl |
|---|---|---|
| Adhesion Strength | Medium (easy to remove) | High (strong, long-term) |
| Best For | Rentals, seasonal décor, kids’ rooms | Kitchens, bathrooms, outdoor use |
| Wall Damage Risk | Low | Moderate to high |
| Price | Usually lower | Often higher |

Credit: thesimplestencil.com
Advanced Tips For Creative Results
If you’re ready to go beyond the basics, try these expert ideas:
- Combine multiple decals: Mix and match designs for a custom look.
- Use decals on furniture: Dress up dressers, desks, or doors.
- Create a gallery wall: Arrange several small decals with framed art for a layered effect.
- Add 3D elements: Glue on lightweight objects (like faux flowers) around the decal for dimension.
- Make a growth chart: Apply a ruler-style decal and mark your child’s height over time.
One non-obvious insight: vinyl decals can double as stencils. Apply, paint over, then peel off for a painted pattern with crisp edges. This works well on walls, wood, or canvas.
How Long Do Vinyl Decals Last?
Most high-quality wall decals last 3–7 years indoors. Several factors affect lifespan:
- Direct sunlight: Fades colors over time
- Humidity: Bathrooms or kitchens may shorten life
- Cleaning: Frequent scrubbing can lift edges
Permanent vinyl is more durable but harder to remove. Removable vinyl offers flexibility but may not last as long, especially in high-traffic areas.
Where To Buy Quality Vinyl Decals
You can find vinyl wall decals at home décor stores, craft shops, and many online sellers. Look for brands with good reviews and clear installation instructions. Custom shops on Etsy or specialty stores often use thicker, more reliable vinyl. For more information on the materials and manufacturing process, visit Wikipedia.
Frequently Asked Questions
How Do I Remove A Vinyl Wall Decal Without Damaging The Wall?
Heat the decal with a hair dryer on low to soften the adhesive. Peel gently from one corner. If residue remains, wipe with warm, soapy water or mild adhesive remover.
Can I Reuse A Vinyl Wall Decal After Removing It?
Most decals lose their stickiness after removal. Some thicker decals may be reusable if removed carefully, but generally, they are designed for one-time use.
Why Won’t My Decal Stick To My Wall?
Common reasons include dust, oil, moisture, or paint that hasn’t cured. Clean the wall well and wait at least two weeks after painting. Smooth, non-textured surfaces give the best results.
Will Decals Damage My Wall Or Paint?
Removable decals are usually safe for most painted walls. Permanent decals or applying too soon after painting can cause damage. Always test on a small, hidden area first.
Can I Apply Decals To Textured Walls?
Yes, but results vary. Press firmly and use a hair dryer to help the vinyl conform. Some textures are too deep for good adhesion, so test a small piece first.
Vinyl wall decals can transform any room with little effort, but careful preparation and a steady hand lead to the best results. With these tips and tricks, you’ll enjoy a smooth, professional look that lasts. Experiment, have fun, and make your space truly yours.
Credit: dalidecals.com