Pantry organization with bins and labels involves categorizing items, selecting appropriate storage containers like clear acrylic, wire, or woven bins, and then clearly labeling them with methods such as vinyl decals, chalkboard labels, or printable tags. This system enhances visibility, reduces waste, and streamlines meal preparation by ensuring every item has a designated, easily identifiable spot, making your kitchen more functional and enjoyable.
- Categorize items before selecting storage solutions.
- Choose bins based on material, style, and item type.
- Implement clear, consistent labeling for easy identification.
- Regular maintenance is key to long-term organization.
- Tailor solutions to your pantry’s size and your family’s needs.
Why Organized Pantries Matter: Benefits Beyond Aesthetics
A well-organized pantry offers far more than just a pleasing visual. It serves as the backbone of an efficient kitchen, directly impacting meal preparation, grocery shopping, and even food waste reduction. When every item has a designated home, finding ingredients becomes a quick task rather than a frustrating search.
This efficiency translates into saved time during busy weeknights and a smoother cooking experience overall. An organized space also allows for better inventory management. You can easily see what you have, what you need to buy, and what items are nearing their expiration date, preventing unnecessary purchases and reducing food spoilage.
Enhanced Visibility and Accessibility
Bins and labels fundamentally improve visibility. Clear containers allow you to see contents at a glance, while opaque bins with clear labels eliminate guesswork. This direct visibility means you’re less likely to forget about items tucked away in the back, ensuring ingredients are used before they expire.
Accessibility also improves significantly. Grouping similar items in dedicated bins means you can pull out a single container to access multiple related ingredients, rather than rummaging through individual packages. This is particularly beneficial for baking supplies, snacks, or breakfast items, making them easy for everyone in the household to find.
Assessing Your Pantry: Before You Buy Bins and Labels
Before investing in any organization tools, a thorough assessment of your current pantry situation is crucial. This initial step helps you understand your specific needs, identify problem areas, and avoid purchasing unnecessary or ill-fitting items. Start by completely emptying your pantry shelves.
As you remove items, check expiration dates and discard anything that is expired, stale, or no longer wanted. This decluttering process is essential for creating a fresh start and accurately gauging the volume and types of items you actually need to store. Wipe down shelves and assess the existing layout.
Categorizing Your Pantry Contents
Once your pantry is empty, begin sorting your food items into logical categories. Common categories include baking supplies, pasta and grains, canned goods, snacks, breakfast items, spices, condiments, and oils. Consider your family’s eating habits and create categories that make sense for your household.
Think about how frequently you use certain items. Daily essentials should be stored in easily accessible locations, while less frequently used ingredients can be placed on higher shelves or in less prominent spots. This categorization forms the foundation for selecting appropriate bins and developing an intuitive labeling system.
Choosing the Right Pantry Organization Bins: Materials and Styles
The market offers a vast array of pantry organization bins, each with unique benefits and aesthetic appeals. Selecting the right materials and styles is key to creating a functional and visually cohesive pantry. Consider factors like durability, ease of cleaning, and how well they integrate with your kitchen’s overall design.
Different materials are suited for different types of food and storage needs. For instance, clear containers are excellent for items you need to see at a glance, while opaque bins can hide less attractive packaging, contributing to a cleaner look. Mix and match styles to create a dynamic yet organized space.
Popular Bin Materials and Their Uses
- Clear Acrylic or Plastic Bins: Ideal for dry goods like pasta, rice, snacks, and baking ingredients. Their transparency allows for quick identification of contents and monitoring of stock levels. They are easy to clean and come in various sizes.
- Wire Baskets: Excellent for items that need air circulation, such as onions, potatoes, or fruits that don’t require refrigeration. They also work well for grouping oddly shaped items like bags of chips or small appliance parts.
- Woven Baskets (Wicker, Rattan): Offer a rustic or farmhouse aesthetic. Best for items that don’t need to be seen, such as extra paper towels, napkins, or less frequently used kitchen gadgets. They add warmth and texture to the pantry.
- Metal Bins: Durable and often stackable, metal bins are great for heavier items like canned goods or bottled beverages. They provide a sleek, industrial look and are very sturdy.
- Glass Jars: Perfect for bulk dry goods, spices, and homemade preserves. They are airtight, preserve freshness, and offer a classic, elegant look. Glass is also non-reactive and easy to clean.
Creative Pantry Organization Bins and Labels Ideas for Every Item
Implementing creative pantry organization bins and labels ideas can transform a chaotic space into a highly functional and aesthetically pleasing area. The goal is to make every item easy to find and put away, reducing stress and saving time in the kitchen. Think about the specific needs of different food types and how bins can best serve them.
For example, tall, narrow bins are perfect for standing up bottles of oils or vinegars, while wider, shallower bins can hold snack pouches or baking mixes. Labels are the finishing touch, providing clarity and allowing for a personalized touch that reflects your style. Consider both functionality and visual appeal when planning your system.
Specific Bin and Label Applications
- Dry Goods (Pasta, Rice, Flour, Sugar): Use clear, airtight containers of varying sizes. Label with the item name and, optionally, the expiration date or cooking instructions. Consider using scoop-friendly containers for flour and sugar.
- Canned Goods: Tiered risers or deep, narrow bins are excellent for organizing cans, allowing you to see multiple rows at once. Label bins by category (e.g., ‘Vegetables’, ‘Soups’, ‘Beans’).
- Snacks and Lunchbox Items: Use open-top bins or baskets for easy grab-and-go access. Label bins with categories like ‘Kids Snacks’, ‘Granola Bars’, or ‘Lunchbox Fillers’. This empowers family members to find their own items.
- Baking Supplies: Dedicate a section with clear containers for flours, sugars, chocolate chips, and sprinkles. Label clearly, perhaps with a decorative font, to make baking a joy. Small jars are great for extracts and food coloring.
- Spices and Seasonings: Use uniform spice jars with matching labels. A tiered spice rack or a drawer insert keeps them visible and accessible. Label both the top and side of the jar for easy identification from above or in a drawer.
- Oils, Vinegars, and Sauces: Use narrow bins or turntables (lazy Susans) to keep bottles upright and prevent spills. Label the bins by type, such as ‘Cooking Oils’ or ‘Asian Sauces’.
Labeling Strategies: Making Your Pantry Intuitive and Stylish
Labels are the unsung heroes of pantry organization. They provide the critical information needed to maintain order and ensure everyone in the household can easily locate and return items. Beyond functionality, labels offer an opportunity to infuse personality and style into your pantry design.
The key is consistency and clarity. Choose a labeling method that is durable, easy to read, and complements your chosen bins and overall kitchen aesthetic. Consider who will be using the pantry most often and design labels that are intuitive for them.
Popular Labeling Methods
- Vinyl Decals: Offer a sleek, professional, and permanent look. They come in various fonts and colors and are water-resistant, making them ideal for containers that might need washing.
- Chalkboard Labels: Provide flexibility, as you can write and erase contents as needed. They work well on various bin materials and offer a charming, rustic appeal. Use a chalk marker for a cleaner, more durable finish.
- Printable Labels/Tags: A versatile and budget-friendly option. You can design and print custom labels at home, attaching them with string, adhesive, or clips. This allows for endless customization in terms of font, color, and graphics.
- Label Maker Tapes: Quick, easy, and highly legible. Label makers produce durable, self-adhesive strips that are great for a clean, uniform look, especially for functional, less decorative areas.
- Handwritten Labels: For a truly personal touch, handwritten labels can add character. Use a permanent marker on bins or attach handwritten tags. Ensure handwriting is clear and consistent.
Step-by-Step Guide to Implementing Your Pantry Organization System
Transforming your pantry from cluttered to coordinated is a systematic process. Following these steps will help ensure a smooth and effective organization project, leading to a pantry that is both beautiful and highly functional.
- Empty and Clean: Remove all items from your pantry. Discard expired or unwanted goods. Thoroughly clean shelves, drawers, and any existing storage units.
- Categorize and Sort: Group similar items together (e.g., baking, snacks, canned goods). This helps you understand the volume of each category and plan for appropriate storage.
- Measure Your Space: Accurately measure the dimensions of your shelves, drawers, and overall pantry space. This is crucial for selecting bins that fit perfectly and maximize storage.
- Select Bins and Containers: Based on your categories and measurements, choose appropriate bins, jars, and baskets. Consider material, size, and style to match your needs and aesthetic.
- Transfer and Fill: Transfer dry goods from original packaging into airtight containers. Fill your chosen bins with their designated categories, ensuring items are accessible.
- Label Everything: Apply your chosen labels to all bins, jars, and shelves. Be clear and consistent with your labeling method.
- Arrange and Optimize: Place heavier items on lower shelves, frequently used items at eye level, and less common items on higher shelves. Use vertical space with stackable bins or risers.
- Create a Maintenance Plan: Establish a routine for quick tidying, checking expiration dates, and restocking. This ensures your organized pantry remains functional long-term.
Common Pantry Organization Mistakes to Avoid
While the desire to organize is strong, certain pitfalls can derail even the best intentions. Being aware of common mistakes can help you navigate your pantry project more effectively and achieve lasting results. Avoiding these errors will save you time, effort, and potential frustration.
One frequent mistake is buying too many bins before assessing your actual needs, leading to wasted resources or ill-fitting solutions. Another is neglecting to label items, which quickly undermines the entire system. Thoughtful planning and execution are key to success.
Pitfalls to Watch Out For
- Buying Bins Before Decluttering: Purchasing containers before you know what you need to store often results in buying the wrong sizes or too many items. Always declutter and categorize first.
- Ignoring Vertical Space: Many pantries have ample vertical space that goes unused. Incorporate stackable bins, shelf risers, or over-the-door organizers to maximize storage capacity.
- Inconsistent Labeling: Using different labeling styles or unclear labels can make it difficult to find items. Choose a consistent method and ensure all labels are legible and accurate.
- Overstuffing Bins: While bins help contain items, overfilling them makes it hard to access contents and can lead to damage or spills. Leave some breathing room.
- Not Considering Accessibility: Place frequently used items at eye level and within easy reach. Less common items can go on higher or lower shelves.
- Forgetting About Maintenance: An organized pantry requires ongoing effort. Without a plan for regular tidying and restocking, it will quickly revert to its former cluttered state.
- Choosing Style Over Function: While aesthetics are important, functionality should always be the priority. Bins should serve a practical purpose first and foremost.
Maintaining Your Organized Pantry: Tips for Long-Term Success
Achieving an organized pantry is a significant accomplishment, but maintaining that order requires ongoing effort. Without a consistent maintenance routine, even the most perfectly arranged system can quickly devolve into chaos. Regular upkeep ensures your pantry remains a functional and stress-free space.
Integrate small organizational habits into your daily or weekly routine. This approach prevents overwhelming clean-up tasks and keeps your pantry operating at peak efficiency. Think of maintenance as an extension of the initial organization process, not a separate chore.
Key Maintenance Strategies
- The ‘One In, One Out’ Rule: When you buy a new item, ensure there’s a designated spot for it. If you’re replacing an item, use up the old one first or discard it if expired before placing the new one.
- Weekly Tidy-Up: Dedicate 5-10 minutes each week to a quick pantry scan. Straighten items, wipe up any spills, and ensure everything is in its correct bin.
- Monthly Deep Dive: Once a month, do a more thorough check. Review expiration dates, consolidate nearly empty packages, and wipe down shelves as needed.
- Restock Smartly: When grocery shopping, place new items behind older ones (first-in, first-out method) to ensure older products are used first.
- Involve the Family: Teach everyone in the household where items belong and encourage them to put things back in their designated spots. Clear labels help immensely with this.
- Adjust as Needed: Your family’s needs and eating habits may change. Be flexible and willing to adjust your organization system, adding or re-purposing bins and labels as required.
Advanced Pantry Organization Hacks for Small and Large Spaces
Whether you’re working with a compact cupboard or a spacious walk-in pantry, there are advanced strategies to maximize every inch and enhance functionality. These hacks go beyond basic bin and label usage, offering creative solutions for unique storage challenges and optimizing accessibility.
For smaller pantries, the focus is on vertical space and multi-functional items. In larger pantries, the challenge often lies in preventing items from getting lost or forgotten. Tailoring your approach to your specific space is crucial for achieving an optimal organizational system.
Maximizing Space and Efficiency
- Door Organizers: Utilize the back of your pantry door with over-the-door racks or clear shoe organizers. These are perfect for spices, small packets, snacks, or even cleaning supplies.
- Lazy Susans (Turntables): Excellent for corner cabinets or deep shelves, lazy Susans make items like oils, condiments, or small jars easily accessible without having to reach to the back.
- Shelf Dividers: Create distinct sections on wide shelves to keep stacks of plates, cutting boards, or different types of food items neatly separated and upright.
- Stackable Bins and Drawers: Maximize vertical space without sacrificing accessibility. Clear stackable drawers are particularly useful for small items that might otherwise get lost.
- Magazine Holders: Repurpose magazine holders to store foil, plastic wrap, parchment paper, or even small boxes of pasta vertically, freeing up shelf space.
- Command Hooks: Use adhesive hooks on the inside of cabinet doors or pantry walls to hang measuring cups, spoons, or small kitchen tools.
- Color-Coding: Beyond labels, use color-coded bins or labels for different categories (e.g., green for healthy snacks, red for baking). This adds another layer of visual organization.
Frequently Asked Questions
What are the best types of pantry organization bins and labels ideas for a small pantry?
For a small pantry, focus on maximizing vertical space and using clear, stackable bins. Slim, airtight containers for dry goods, tiered shelf risers for cans, and over-the-door organizers are highly effective. For labels, consider clear vinyl decals or a label maker for a clean, uniform look that doesn’t add visual clutter.
How can I ensure my pantry organization bins and labels ideas are sustainable and eco-friendly?
To ensure sustainability, opt for durable, reusable bins made from materials like glass, stainless steel, or bamboo. Repurpose existing containers where possible. For labels, choose reusable options like chalkboard labels or printable tags made from recycled paper, allowing for updates without constant waste.
What are some budget-friendly pantry organization bins and labels ideas?
Budget-friendly options include repurposing glass jars from food items, using shoeboxes covered in decorative paper, or simple plastic containers. For labels, use masking tape and a marker, or design and print your own labels at home using standard paper and adhesive. Look for sales on basic wire baskets or clear plastic bins.
How do I choose the right size and shape of pantry organization bins for different food items?
Measure your pantry shelves and the items you plan to store. Use tall, narrow bins for bottles, wide and shallow bins for snacks, and airtight containers that match the volume of your dry goods. Consider stackable options for items you need to access frequently, and use tiered risers for cans to prevent items from getting lost.
Can pantry organization bins and labels ideas really save me time in the kitchen?
Absolutely. An organized pantry with clear bins and labels significantly reduces the time spent searching for ingredients. Knowing exactly where everything is and seeing stock levels at a glance streamlines meal planning, grocery shopping, and cooking, making your kitchen routine much more efficient.
What are the latest trends in pantry organization bins and labels ideas?
Current trends lean towards minimalist aesthetics, with clear acrylic or glass containers and elegant, uniform labels (often custom vinyl decals in modern fonts). Sustainable materials like bamboo and natural wood are also popular. Smart storage solutions that integrate technology, such as motion-sensor lighting, are also gaining traction.
Conclusion
Implementing effective pantry organization bins and labels ideas is a transformative step towards a more efficient and enjoyable kitchen. By systematically decluttering, categorizing, and selecting appropriate storage solutions, you create a space where every item is easily found and maintained. This not only enhances the visual appeal of your pantry but also significantly reduces food waste and streamlines your daily routines.
Take the time to assess your unique needs, choose bins and labels that reflect your style and functionality requirements, and establish a simple maintenance routine. A well-organized pantry is an investment in your home’s harmony and your culinary peace of mind. Start your pantry transformation today and experience the lasting benefits of a truly organized space.
{“@context”:”https://schema.org”,”@type”:”Article”,”headline”:”Ultimate Guide to Pantry Organization Bins and Labels Ideas”,”mainEntityOfPage”:”https://homegeartoday.com/?p=117″,”datePublished”:”2025-12-13T03:19:27+00:00″,”dateModified”:”2025-12-13T03:19:27+00:00″}
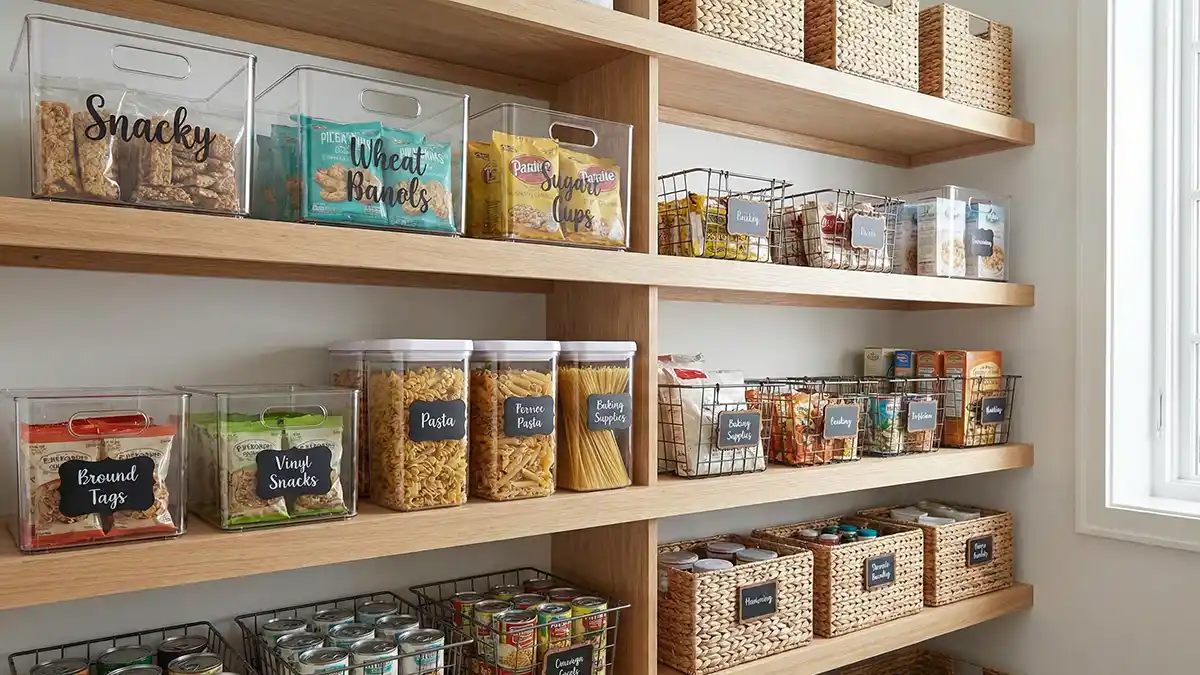
Clear, rectangular bins with handles (like mDesign or Lifewit pantry bins) are the most practical for pantry use. They group similar categories together, slide out easily for access, show contents at a glance, and stack uniformly to maximize shelf space efficiency.
Label each bin on the front face at eye level with the category name (Pasta, Snacks, Baking, Canned Goods). Use consistent font and label style — a label maker creates the cleanest result. Include both the zone label on the shelf and item labels on individual containers inside the bin.
Clear bins allow you to see contents without reading labels, making visual inventory checks instantaneous. Opaque bins look cleaner and more cohesive but require more reliance on labeling. Most effective pantry organizations use clear containers inside coordinating opaque or colored bins for the best of both.
Assign one bin per category: pasta and grains, snacks, canned goods, baking supplies, breakfast items, condiments. Line bins up consistently on shelves with labels facing outward. Store most-used categories at eye level and less-used items on higher or lower shelves for efficient daily access.
Large 10×14 inch bins suit bulky items like cereal boxes, bread, and pasta bags. Medium 8×12 inch bins work for snacks, spices, and canned goods. Small 6×8 inch bins are ideal for spice packets, nuts, and individually packaged items. Consistent sizing within each shelf creates the most orderly appearance.
