To effectively clean and maintain an air fryer, always unplug it and allow it to cool completely before starting. For routine cleaning, wash the basket and pan with warm, soapy water after each use. For a deeper clean, address the heating element and interior with a damp cloth and mild detergent, ensuring all components are thoroughly dry before reassembly. Consistent maintenance prevents residue buildup, ensures optimal performance, and promotes food safety.
- Always unplug and cool your air fryer before cleaning.
- Wash removable parts with warm, soapy water after every use.
- Deep clean the heating element and interior regularly.
- Ensure all components are completely dry before reassembly.
- Regular maintenance extends appliance lifespan and ensures food safety.
Why Regular Air Fryer Cleaning Matters for Performance and Health
Regular cleaning of your air fryer is not merely about aesthetics; it is crucial for both the appliance’s performance and your health. Over time, food particles, grease, and oil can accumulate on the basket, pan, and even the heating element. This buildup can lead to several issues that compromise the air fryer’s efficiency and the quality of your meals.
When grease and food residue accumulate, they can impede airflow, causing the air fryer to cook unevenly or less efficiently. This means your food might not achieve that desired crispy texture, or it could take longer to cook. Furthermore, burnt-on residue can impart unpleasant odors and flavors to your food, affecting its taste. From a health perspective, old food particles can harbor bacteria, and excessive smoke from burning grease can be a respiratory irritant. Consistent cleaning ensures your air fryer operates at its best, delivering delicious and safe meals every time.
Essential Tools and Supplies for Effective Air Fryer Cleaning
Having the right tools and supplies makes the cleaning process much easier and more effective. Most of these items are likely already in your kitchen or easily accessible. Gathering them before you start will streamline your cleaning routine.
- Soft Sponge or Non-Abrasive Brush: Ideal for scrubbing removable parts without scratching non-stick coatings.
- Dish Soap: A mild dishwashing liquid is effective for cutting through grease and food residue.
- Microfiber Cloths: Excellent for wiping down the exterior and interior, leaving no lint behind.
- Paper Towels: Useful for initial wiping of excess grease and drying.
- Warm Water: Essential for washing and rinsing.
- Baking Soda (Optional): A natural abrasive for stubborn stains and odor absorption.
- White Vinegar (Optional): Great for deodorizing and breaking down mineral deposits.
- Soft-Bristled Toothbrush or Small Brush: Perfect for reaching tight spots and around the heating element.
- Spray Bottle (Optional): For a diluted vinegar solution or water for rinsing.
Safety First: Crucial Pre-Cleaning Steps for Your Air Fryer
Before you even think about cleaning your air fryer, prioritizing safety is paramount. Neglecting these initial steps can lead to electrical hazards or burns. Always ensure the appliance is completely safe to handle before proceeding with any cleaning.
- Unplug the Air Fryer: This is the most critical step. Disconnect the appliance from the power outlet to eliminate any risk of electric shock.
- Allow it to Cool Completely: Air fryers operate at high temperatures. Attempting to clean a hot appliance can result in severe burns. Give it ample time, typically 30 minutes to an hour, to cool down to room temperature.
- Remove All Detachable Parts: Carefully take out the basket, pan, and any racks or trays. These parts are usually designed for easy removal and separate cleaning.
- Empty Any Loose Food Debris: Before washing, gently shake out any crumbs or large food particles into a trash can. This prevents them from clogging your sink drain.
How to Clean and Maintain Air Fryer After Every Use (Daily Cleaning)
Consistent daily cleaning is the cornerstone of air fryer maintenance. Addressing food residue immediately after use prevents it from hardening and becoming more difficult to remove later. This routine keeps your appliance hygienic and ready for its next task.
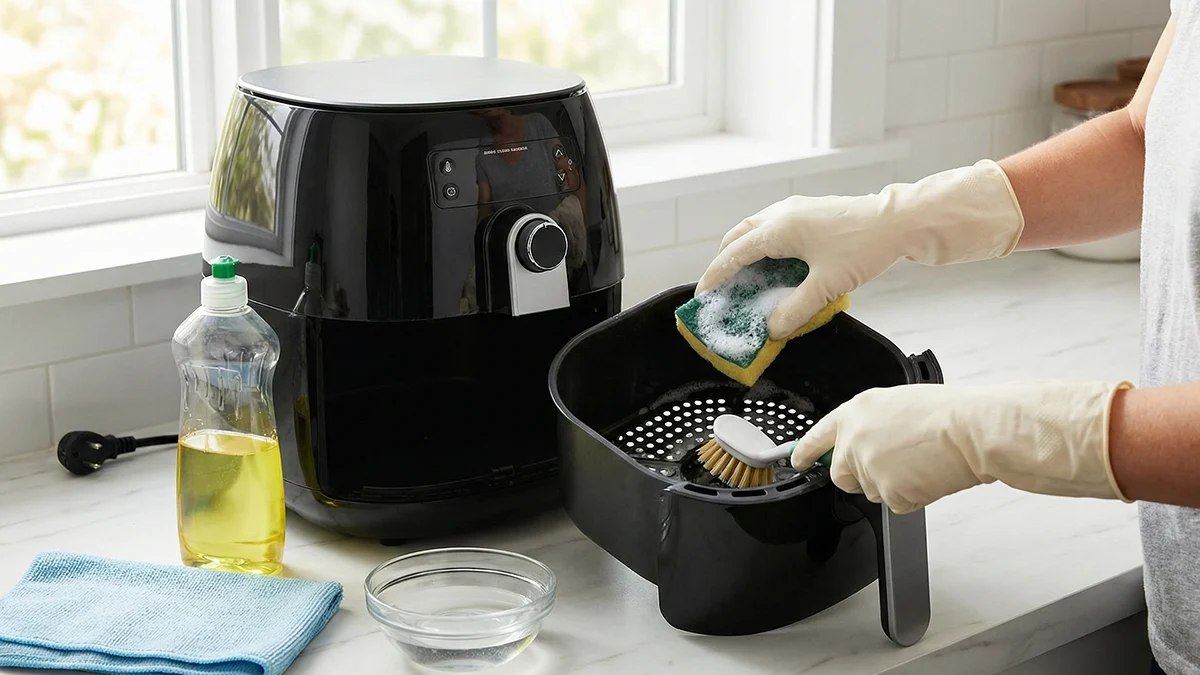
- Remove and Soak Detachable Parts: Once the air fryer is cool, remove the basket and pan. Fill your sink with warm water and a few drops of dish soap, then let these parts soak for 10-15 minutes. This helps loosen any stuck-on food.
- Wash with Soap and Water: Using a soft sponge or non-abrasive brush, thoroughly scrub the basket and pan. Pay attention to corners and crevices where grease can hide. For non-stick surfaces, avoid harsh scrubbers that could damage the coating.
- Rinse Thoroughly: Rinse all parts under running warm water until all soap residue is gone.
- Dry Completely: This step is vital to prevent rust and bacterial growth. Use a clean towel to dry all components thoroughly. Alternatively, allow them to air dry completely before reassembling them into the air fryer base.
- Wipe Down the Exterior: Use a damp microfiber cloth to wipe the exterior of the air fryer, removing any splatters or fingerprints.
Deep Cleaning Your Air Fryer: A Step-by-Step Guide
While daily cleaning handles most residue, a deep clean is necessary every few weeks or after cooking particularly greasy meals. This process targets areas not typically reached during routine cleaning, ensuring comprehensive hygiene.
Preparing for a Deep Clean
Before you begin, ensure the air fryer is unplugged and completely cool. Gather your cleaning supplies, including a soft brush, mild dish soap, microfiber cloths, and potentially baking soda or white vinegar for stubborn areas. Remove all detachable parts, including the basket, pan, and any racks.
Cleaning the Interior Cavity
The interior cavity, where the basket sits, can accumulate grease and food splatters. Use a damp cloth with a small amount of mild dish soap to wipe down the interior walls. For tougher spots, a paste of baking soda and water can be gently applied, left for a few minutes, then wiped away. Always ensure no water or cleaning solution drips onto the heating element or electrical components.
Cleaning the Heating Element
The heating element is often overlooked but can accumulate significant grease. Turn the air fryer upside down for easier access. Use a soft-bristled brush or an old toothbrush to gently scrub away any visible food particles or grease from the heating coil. A slightly damp cloth (not wet) can be used to wipe the element, but be extremely careful not to get it too wet. Ensure it is completely dry before flipping the air fryer back over.
Final Rinse and Dry
After cleaning all parts, rinse the basket and pan thoroughly under warm water. For the interior and heating element, use a clean, damp cloth to wipe away any soap or baking soda residue. It is crucial that all components, especially the heating element and interior, are completely dry before reassembling the air fryer and plugging it back in. Air drying for several hours or even overnight is recommended for the interior.
Cleaning the Air Fryer Heating Element and Interior Safely
Cleaning the heating element and interior of your air fryer requires a delicate touch to avoid damage and ensure safety. These areas are not designed to be submerged in water, so a different approach is necessary compared to the removable parts.
Accessing the Heating Element
To safely clean the heating element, first ensure the air fryer is unplugged and completely cool. For most models, you will need to turn the air fryer upside down to get a clear view and access to the heating coil located at the top of the interior cavity. Some models may have a protective mesh that needs to be carefully removed first.
Gentle Cleaning Techniques
Use a soft-bristled brush, like a clean toothbrush or a small bottle brush, to gently dislodge any dried food particles or grease from the heating coil. Avoid using metal brushes or abrasive scrubbers, as these can scratch or damage the element. For stubborn, baked-on grease, a slightly damp (not wet) cloth with a tiny amount of mild dish soap can be used to carefully wipe the element. Immediately follow with a clean, damp cloth to remove soap residue, then a dry cloth. The key is to use as little moisture as possible and ensure the element is completely dry before use.
Cleaning the Interior Walls
For the interior walls of the air fryer, use a damp microfiber cloth with a small amount of mild dish soap. Wipe down all surfaces, paying attention to any splatters or grease buildup. For tougher spots, a paste made from baking soda and a little water can be applied, left for a few minutes, then gently wiped away with a damp cloth. Always ensure no liquid drips onto the electrical components or the fan motor. After cleaning, wipe the interior with a clean, damp cloth to remove any cleaning solution residue, then dry thoroughly with a clean, dry cloth or allow it to air dry completely.
Tackling Stubborn Grease and Baked-On Food Residue
Stubborn grease and baked-on food residue can be a challenge, but with the right techniques, they can be effectively removed without damaging your air fryer. Patience and the correct cleaning agents are key.
Soaking for Success
For the air fryer basket and pan, soaking is your best friend. Fill the sink with hot water and a generous amount of dish soap. Submerge the parts and let them soak for at least 30 minutes, or even a few hours for very tough residue. The hot water and soap will work to break down the grease and soften the baked-on food, making it much easier to scrub away.
Using Natural Abrasives
Once soaked, if residue remains, a paste of baking soda and a small amount of water can be applied directly to the stubborn spots. Let the paste sit for 15-20 minutes. Baking soda acts as a gentle abrasive that helps lift the grime without scratching non-stick surfaces. After the waiting period, use a non-abrasive sponge or brush to gently scrub the area. The combination of soaking and baking soda should effectively remove most stubborn residue.
Vinegar for Deodorizing and Degreasing
White vinegar is excellent for cutting through grease and neutralizing odors. For the interior cavity (avoiding the heating element), you can spray a diluted solution of white vinegar and water (50/50) onto stubborn grease spots. Let it sit for 5-10 minutes, then wipe clean with a damp cloth. For the basket and pan, a vinegar rinse after washing can help remove any lingering grease film and leave them sparkling clean. Always rinse thoroughly with water afterward to remove any vinegar smell.
Maintaining Your Air Fryer for Optimal Performance and Longevity
Beyond cleaning, a few simple maintenance practices can significantly extend the life of your air fryer and ensure it continues to perform at its best. These habits contribute to both efficiency and safety.
Regular Inspections
Periodically inspect your air fryer for any signs of wear and tear. Check the power cord for fraying or damage, and ensure the plug is intact. Examine the basket and pan for any chipping or damage to the non-stick coating, which can affect cooking performance and potentially release harmful substances. Also, look for any loose screws or components that might need tightening.
Proper Storage
When not in use, store your air fryer in a clean, dry place. Avoid storing it in areas with high humidity or extreme temperatures, as this can affect its electronic components. Ensure it is completely dry before storing to prevent mold or mildew growth, especially if it’s going into a cabinet for an extended period.
Avoid Overfilling
Overfilling the air fryer basket can restrict airflow, leading to uneven cooking and putting unnecessary strain on the appliance. It can also cause food to cook improperly, leading to more residue buildup. Always adhere to the manufacturer’s recommended fill lines and batch sizes for optimal performance and easier cleaning.
Use Air Fryer Liners
Consider using parchment paper liners or silicone mats specifically designed for air fryers. These can significantly reduce the amount of food and grease that comes into direct contact with the basket and pan, making daily cleaning much quicker and easier. Ensure the liners do not block airflow or touch the heating element.
Common Air Fryer Cleaning Mistakes to Avoid
While cleaning an air fryer seems straightforward, certain mistakes can damage the appliance or compromise its effectiveness. Being aware of these pitfalls can help you maintain your air fryer properly.
- Cleaning While Hot: Attempting to clean a hot air fryer is a major safety hazard, risking severe burns. Always wait until the unit is completely cool.
- Using Abrasive Cleaners or Scourers: Metal brushes, steel wool, or harsh abrasive cleaners can scratch and damage the non-stick coating on the basket and pan, leading to flaking and reduced performance.
- Submerging the Main Unit: The main body of the air fryer, which contains electrical components, should never be submerged in water. This can cause electrical shorts and permanent damage.
- Not Drying Parts Completely: Reassembling or storing parts that are still damp can lead to rust, mildew, or bacterial growth, compromising hygiene and the appliance’s lifespan.
- Neglecting the Heating Element: Overlooking the heating element allows grease and food particles to accumulate and burn, causing smoke, odors, and inefficient cooking.
- Using Too Much Water on Electrical Components: When cleaning the interior or heating element, excessive water can seep into electrical parts, causing damage or creating a safety hazard.
Troubleshooting Air Fryer Issues Related to Poor Cleaning
Many common air fryer problems can be directly linked to inadequate cleaning. Recognizing these issues can help you diagnose and resolve them by simply improving your cleaning routine.
Excessive Smoke During Operation
One of the most common signs of a dirty air fryer is excessive smoke during cooking. This usually indicates that old grease or food particles have accumulated on the heating element or in the bottom of the pan, burning off when the air fryer heats up. A thorough deep clean, focusing on the heating element and interior cavity, is often the solution.
Unpleasant Odors
If your air fryer emits a persistent foul smell, even when not in use, it’s a strong indicator of trapped food residue or rancid grease. These odors can transfer to your food, making it unappetizing. A deep clean, including deodorizing with white vinegar or baking soda, can eliminate these smells.
Uneven Cooking or Reduced Performance
When airflow is obstructed by grease buildup on the basket, pan, or heating element, the air fryer cannot circulate hot air effectively. This results in food that cooks unevenly, takes longer, or doesn’t achieve the desired crispiness. A comprehensive cleaning will restore proper airflow and cooking efficiency.
Food Sticking to the Basket
While some sticking can be normal, excessive sticking, especially after cleaning, might indicate damage to the non-stick coating due to abrasive cleaning methods. However, often it’s simply a layer of baked-on residue that hasn’t been fully removed, creating a rough surface for food to adhere to.
When to Replace Your Air Fryer Parts or the Entire Unit
Even with diligent cleaning and maintenance, air fryer components, or the entire unit, will eventually need replacement. Knowing when to replace parts or the appliance itself can save you frustration and ensure continued safe operation.
Damaged Non-Stick Coating
If the non-stick coating on your air fryer basket or pan is significantly scratched, flaking, or peeling, it’s time for a replacement. Damaged coatings can cause food to stick excessively and may release particles into your food. Many manufacturers offer replacement baskets and pans.
Frayed Power Cord or Damaged Plug
Any visible damage to the power cord, such as fraying, cuts, or exposed wires, or a damaged plug, is a serious safety hazard. Do not use the air fryer if the cord or plug is compromised. In most cases, these components are not user-replaceable, meaning the entire unit should be replaced.
Persistent Malfunctions
If your air fryer consistently malfunctions despite proper cleaning and troubleshooting, such as not heating up, the fan not working, or displaying error codes, it might be nearing the end of its lifespan. If the appliance is out of warranty and repairs are not feasible or cost-effective, replacing the unit is often the best course of action.
Excessive Smoke or Burning Smell After Cleaning
If you’ve thoroughly deep cleaned your air fryer, including the heating element, and it still produces excessive smoke or a strong burning smell during operation, it could indicate a more serious internal issue or a severely degraded heating element. For safety, consider replacing the unit.
Frequently Asked Questions
How often should I clean my air fryer to maintain it properly?
For optimal maintenance, you should clean the air fryer basket and pan after every use. A deeper clean, targeting the interior cavity and heating element, is recommended every two to four weeks, or more frequently if you use it often or cook greasy foods.
Can I put air fryer parts in the dishwasher when I clean and maintain it?
Many air fryer baskets and pans are dishwasher-safe, but it’s crucial to check your specific model’s user manual. If they are, place them on the top rack to prevent damage. Always hand wash the main unit and avoid submerging any electrical components.
What’s the best way to clean and maintain an air fryer with baked-on grease?
For baked-on grease, soak the removable parts in hot, soapy water for at least 30 minutes. Then, apply a paste of baking soda and water to the stubborn areas, let it sit, and gently scrub with a non-abrasive sponge. White vinegar can also help break down grease.
Are there any specific products I should avoid when cleaning and maintaining my air fryer?
Avoid abrasive cleaners, steel wool, metal brushes, or harsh chemical degreasers, as these can damage the non-stick coating and other surfaces. Also, do not use excessive water or spray directly onto the heating element or electrical components.
How can I prevent my air fryer from smelling bad even after I clean and maintain it?
To prevent bad smells, ensure all parts are thoroughly cleaned and completely dry after each use. For lingering odors, wipe the interior with a diluted white vinegar solution, or place a small bowl of baking soda inside the cooled air fryer overnight to absorb smells.
What are the signs that my air fryer needs a deep clean and maintenance beyond daily washing?
Signs your air fryer needs a deep clean include excessive smoke during cooking, persistent unpleasant odors, unevenly cooked food, or visible grease buildup on the heating element or interior walls. If daily washing isn’t resolving these issues, a deep clean is necessary.
Conclusion
Maintaining a clean air fryer is essential for its performance, longevity, and the safety of your food. By consistently following daily cleaning routines and performing regular deep cleans, you can prevent grease buildup, eliminate odors, and ensure your appliance continues to deliver perfectly cooked meals. Remember to always prioritize safety by unplugging and cooling the unit before any cleaning. Embrace these simple practices to keep your air fryer in top condition for years to come.
{“@context”:”https://schema.org”,”@type”:”Article”,”headline”:”How To Clean And Maintain Air Fryer”,”mainEntityOfPage”:”https://homegeartoday.com/?p=111″,”datePublished”:”2025-12-12T15:16:58+00:00″,”dateModified”:”2025-12-12T15:16:58+00:00″}
Related: how to descale a coffee machine at home
- Unplug and Let It Cool Completely
Always unplug your air fryer and allow it to cool for at least 30 minutes before cleaning. Cleaning while warm can cause burns and may damage non-stick coatings.
- Remove and Wash the Basket and Tray
Remove the cooking basket and drip tray and wash them with warm soapy water and a soft sponge. Most baskets are dishwasher-safe — check your manual to confirm.
- Clean the Interior Heating Element
Use a damp cloth or soft brush to gently wipe food residue from the heating element at the top of the interior. Never spray water directly into the unit.
- Wipe Down the Interior Walls
Dampen a microfiber cloth with warm water and a drop of dish soap. Wipe the interior walls to remove grease splatter, then wipe again with a clean damp cloth to remove soap residue.
- Clean the Exterior
Wipe the outside of the air fryer with a damp cloth. For stubborn grease marks, use a mixture of dish soap and warm water. Dry thoroughly before plugging in again.
- Deep Clean Monthly
Once a month, soak the basket and tray in warm soapy water for 20–30 minutes to dissolve built-up grease. Use baking soda paste on stubborn stains, then rinse thoroughly.
