Lower back pain is a common problem for office workers. Hours spent sitting in one position can make your back feel stiff, sore, or even lead to long-term issues. But many people don’t realize that the way they adjust their office chair can make a huge difference.
A well-adjusted chair supports your spine, helps you sit with better posture, and reduces pressure on your lower back. In this guide, you’ll learn exactly how to set up your office chair for lower back comfort—even if you’re new to ergonomic principles.
By the end, you’ll know simple steps, practical examples, and a few pro tips that most people miss.
Why Chair Adjustment Matters For Lower Back Pain
When you sit for long periods, your lower back (also called the lumbar region) carries much of your upper body’s weight. If your chair doesn’t support this area, your muscles and spine work harder, which can lead to pain, fatigue, and even injury over time.
Research shows that about 80% of people experience back pain at some point in their lives, and office workers are at higher risk. According to the American Chiropractic Association, poor sitting posture is a leading cause.
But there’s good news: simple changes to your chair setup can take pressure off your lower back, improve blood flow, and make work more comfortable. The real challenge is knowing what to adjust—and how.
Key Features Of An Ergonomic Office Chair
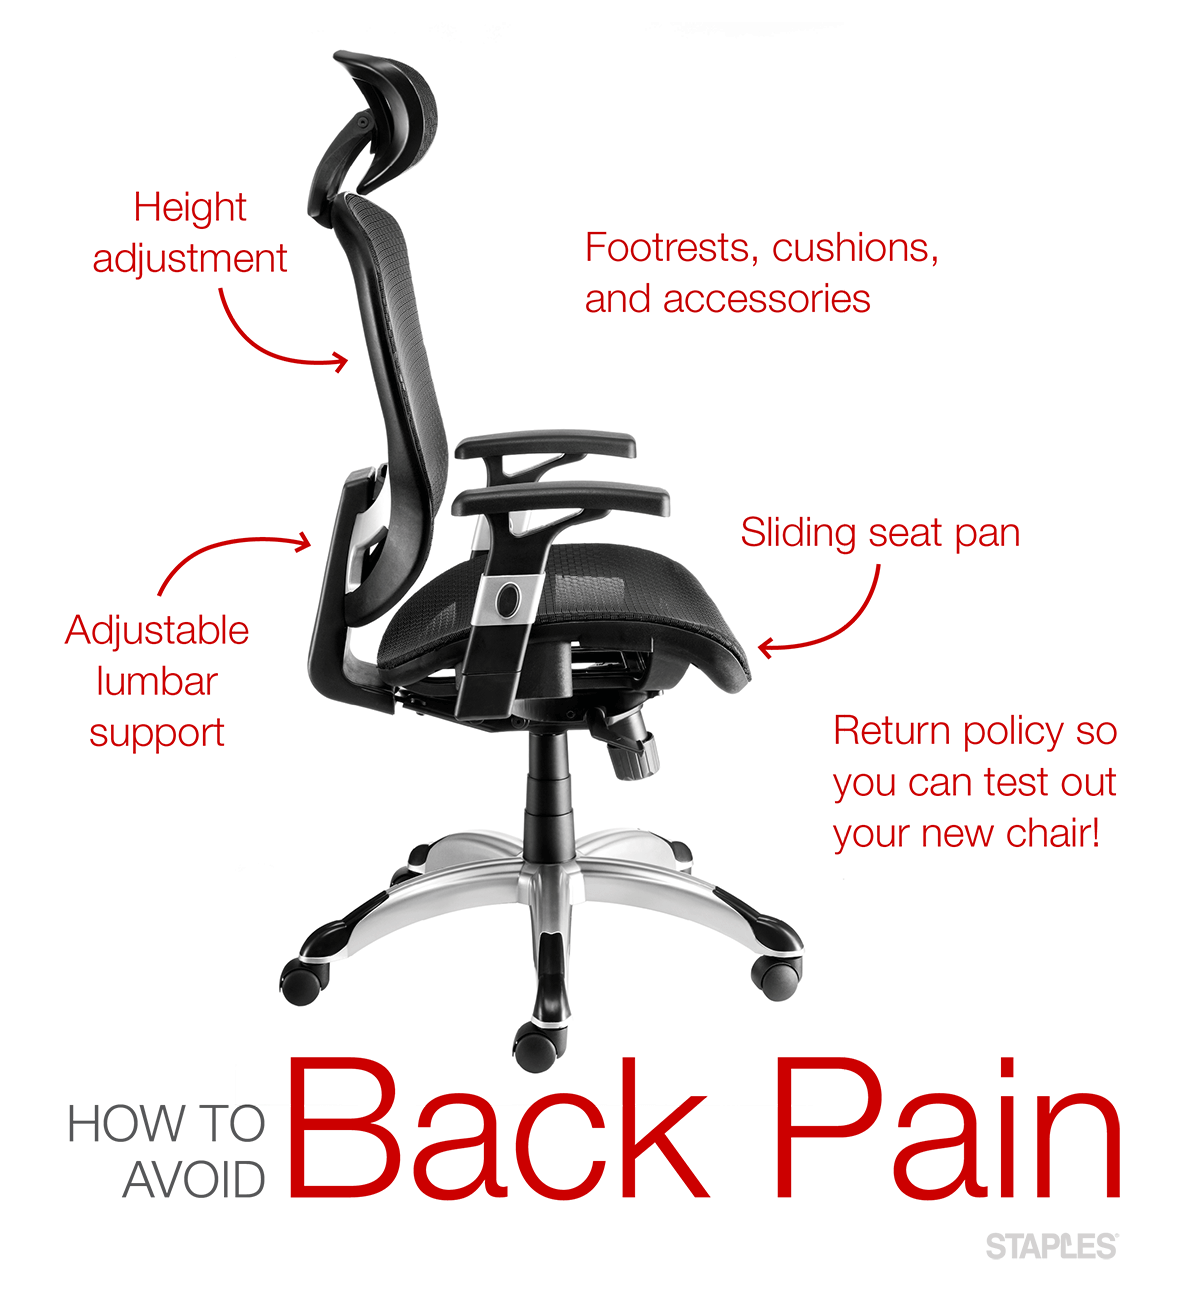
Before you adjust anything, it helps to know what your chair can do. Not all office chairs are equal. The best chairs for lower back pain have certain features:
- Adjustable seat height
- Adjustable seat depth
- Lumbar (lower back) support
- Adjustable backrest tilt and tension
- Armrest adjustability
- Swivel and smooth movement
Here’s a quick comparison of common office chair types and how they support your lower back:
| Chair Type | Lumbar Support | Seat Adjustability | Typical Price |
|---|---|---|---|
| Basic Task Chair | No | Limited | $50-$100 |
| Ergonomic Chair | Yes | High | $200-$800 |
| Executive Chair | Partial | Medium | $150-$500 |
If your current chair lacks lumbar support or adjustability, you can still follow most of the steps below. For those with basic chairs, a lumbar cushion or rolled towel can help.
Step-by-step Guide: Adjusting Your Office Chair For Lower Back Pain
Let’s break down each adjustment. Follow these steps in order for best results.
1. Set The Right Seat Height
Your feet should rest flat on the floor. Your knees should be at a 90-degree angle (or slightly lower than your hips). If your chair is too high or low, it strains your back and legs.
- Stand in front of your chair and adjust the seat so the top is just below your kneecap.
- Sit down and check: Can you place your feet flat with your knees at a right angle?
- If your feet dangle, use a footrest.
2. Adjust Seat Depth
Seat depth means the distance from the front of the seat to the backrest. You want a small gap (about 2-4 fingers’ width) between the seat and the back of your knees.
- Slide the seat pan (if adjustable) forward or backward.
- If the seat is too deep, you’ll slouch or lose back support.
- If it’s too short, your thighs won’t be supported and pressure increases under your thighs.
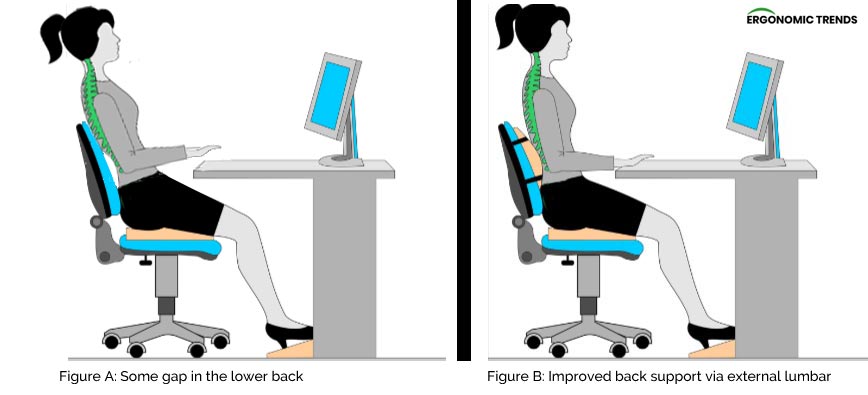
3. Set Lumbar Support
The lumbar support should fit the curve of your lower back. Not all chairs have built-in lumbar support, but many do.
- Adjust the lumbar support up or down until it presses gently into your lower back.
- It should support your spine’s natural “S” shape, not feel hard or push you forward.
- If your chair doesn’t have lumbar support, use a small pillow or a rolled towel.
4. Adjust Backrest Angle And Tension
The backrest should support you while you sit upright but also let you lean back slightly.
- Set the backrest angle between 90–110 degrees for most comfort.
- Adjust the tension so you can lean back with gentle resistance, not sudden drops or stiffness.
5. Adjust Armrests (if Available)
Armrests take pressure off your shoulders and upper back—but only if set correctly.
- Position armrests so your elbows rest at a 90-degree angle and your shoulders are relaxed.
- Your arms should hover just above your keyboard, not reaching up or slumping down.
- Move armrests out of the way if they prevent you from pulling your chair close to your desk.
6. Check Seat Tilt
Some chairs let you tilt the seat pan forward or backward. A slight forward tilt can reduce pressure on your lower back, but too much may cause sliding.
- Start with the seat pan level.
- Experiment with a slight forward tilt if you feel pressure under your thighs.
7. Position Yourself At The Desk
Once the chair is set, your desk and monitor height matter too.
- Sit with your back against the backrest.
- Your eyes should look straight ahead at the top third of your monitor.
- Keep your keyboard and mouse close, so you don’t lean forward.
8. Fine-tune And Test
After adjusting, sit for 10–15 minutes. Notice any tension, numbness, or discomfort. Make small changes until your back feels supported and relaxed.
Common Mistakes When Adjusting Your Office Chair
Even with good intentions, many people make small errors that cause discomfort. Here are some mistakes to avoid:
- Ignoring seat depth: Many only adjust height, but seat depth is just as important.
- Setting lumbar support too high or low: The support should fit the curve of your lower back, not your mid or upper back.
- Using armrests incorrectly: Armrests should help you relax—not make you hunch your shoulders or sit far from your desk.
- Not checking after adjustment: Always test your setup with real working posture, not just while sitting still.
- Forgetting about desk height: Even a perfect chair setup won’t help if your desk is too high or low.
Credit: www.andalucianshop.com
Quick Reference: Ideal Office Chair Setup
Here is a summary of the recommended settings for office chairs to reduce lower back pain:
| Adjustment | Recommended Setting | Why It Matters |
|---|---|---|
| Seat Height | Feet flat, knees at 90° | Reduces leg and lower back pressure |
| Seat Depth | 2-4 fingers gap at knees | Prevents thigh pressure, supports back |
| Lumbar Support | Fitted to lower back curve | Supports spine’s natural shape |
| Backrest Angle | 90–110° | Allows relaxed, upright posture |
| Armrest Height | Elbows at 90°, shoulders relaxed | Takes pressure off upper back |
Non-obvious Tips For Reducing Lower Back Pain
Most guides stop at adjustment, but there are a few extra strategies that make a big difference:
- Change positions often: Even perfect chair setup won’t help if you sit in one position for hours. Stand, stretch, or walk for a few minutes every hour.
- Watch your wallet and phone: Sitting with a wallet or phone in your back pocket can tilt your pelvis and strain your lower back. Always empty your pockets before sitting.
- Use a timer: Set a reminder to check your posture every 30–60 minutes. This helps you avoid slipping back into bad habits.

Credit: rackorapro.com
When To Consider A New Chair
If you have adjusted everything and still feel pain, your chair may not be right for you. Look for these signs:
- No lumbar support, and you can’t add a cushion comfortably
- Seat is too deep or shallow for your legs
- Chair doesn’t adjust enough for your body size
Investing in an ergonomic chair with adjustable features is usually worth it for your long-term health and productivity. For more on what to look for, see this guide to office chairs for back pain.
Practical Example: Adjusting A Typical Office Chair
Let’s walk through a real-life setup. Suppose you have a standard ergonomic chair at work.
- Raise the seat so your feet are flat, knees at a right angle.
- Slide the seat pan so there’s a two-finger gap behind your knees.
- Move the lumbar support up until it fits your lower back curve.
- Set the backrest angle to 100° so you can lean back slightly while typing.
- Adjust armrests so your forearms rest lightly, elbows bent, shoulders relaxed.
- Pull your chair close to your desk, with your monitor at eye level.
- Sit back in the chair, and make small tweaks as you notice discomfort.
After 15 minutes, you might realize your lower back feels better, but your shoulders are tense. Try lowering the armrests slightly and moving your mouse closer.
Data On Chair Adjustment And Back Health
A study published in the journal “Spine” found that ergonomic interventions, including proper chair adjustment, can reduce back pain by up to 40% in office workers. Employees who learned how to adjust their chairs and took regular breaks reported less pain and higher productivity.
Another survey showed that companies investing in ergonomic training saw a 32% decrease in reported back pain within six months.
Frequently Asked Questions
What Is The Best Chair Position For Lower Back Pain?
The best position is sitting with your feet flat, knees at a 90-degree angle, hips slightly higher than your knees, and your lower back supported by the chair’s lumbar support. Keep your backrest tilted slightly (100–110 degrees) for comfort.
Do I Need A Special Chair To Avoid Back Pain?
Not always. Many standard chairs can be adjusted for good support. However, if your chair lacks lumbar support or adjustability, an ergonomic chair or a lumbar cushion is a good investment.
How Often Should I Change My Sitting Position?
Every 30–60 minutes, stand up, stretch, or change posture. Sitting in one position too long puts stress on your back and muscles, even if your chair is well adjusted.
What If My Chair Doesn’t Have Lumbar Support?
You can use a small pillow, a rolled towel, or buy a lumbar cushion to add support. Place it at the curve of your lower back and adjust your sitting position as needed.
Can Adjusting My Chair Really Reduce Back Pain?
Yes, proper chair adjustment can reduce back pain significantly. Studies show that ergonomic adjustments help decrease pain, improve comfort, and can even increase your work performance.
Adjusting your office chair is one of the simplest, most effective steps you can take for a healthier back. It takes just a few minutes, but the impact lasts all day. Make these changes part of your daily routine, and your lower back will thank you.
Credit: salisburyfertilitycentre.nhs.uk
For more helpful guides, check out ergonomic chair vs gaming chair comparison, how to set up correct chair height, and home office chair maintenance tips.
- Set the Correct Seat Height
Adjust seat height so your feet rest flat on the floor, knees are at 90 degrees, and thighs are roughly parallel to the ground.
- Position the Lumbar Support
Adjust the lumbar support so it sits in the natural curve of your lower back (just above the belt line). This prevents slouching.
- Set Seat Depth
Adjust seat depth so there is a 2-3 finger gap between the seat edge and the back of your knees to avoid pressure on the thighs.
- Adjust Armrests
Set armrests so your arms rest at a comfortable 90-degree angle with shoulders relaxed — not raised or hunched.
- Set Monitor at Eye Level
Position your monitor so the top of the screen is at or slightly below eye level. This prevents neck strain that contributes to back pain.
- Take Regular Breaks
Even a perfectly adjusted chair cannot replace movement. Stand and walk for 5 minutes every 45-60 minutes to relieve back pressure.
